VirtualBox Raw Disk Access & Booting from Real Partitions
Discover the power of raw disk access and learn how to boot your virtual machines directly from real disk partitions.
Joey Miller • Last updated August 17, 2025
Introduction to VirtualBox
VirtualBox is a widely used virtualization software that was acquired by Oracle in 2010. It enables users to create and run software-based emulations of a physical computer system (virtual machines) on their computers. This allows users to run multiple operating systems simultaneously without the need for separate physical hardware. Whether you're a developer or simply someone looking to experiment with different operating systems, VirtualBox provides a convenient way to accomplish this.
What is raw hard disk access?
When setting up a virtual machine in VirtualBox, you typically create a virtual hard disk file that acts as a container for the guest's operating system data. This approach is efficient and straightforward for most use cases.
However, there are situations where allowing raw access to a real disk partition can be highly advantageous. Raw access, also known as "raw disk access" or "raw disk mode," allows VirtualBox to directly interact with a real partition on your physical hard drive - instead of using a virtual hard disk file.
Reasons you may be interested in raw hard disk access:
- Dual-booting: On a dual-boot system with both Windows and Linux, you may like to access both operating systems simultaneously (regardless of which you booted into).
- Performance: Raw disk access may improve performance compared to virtual hard disk files. It can reduce overhead and latency, leading to improved disk IO performance.
Raw access booting involves direct interaction with your physical disk, which can lead to data loss if not handled properly. Ensure you have a good understanding of the implications and risks involved, and backup all important data before continuing.
Prerequisites
Author's Note: Proceed at your own risk. These instructions worked for me, and hopefully will for you too - but no guarantees. Ensure you have made backups of important files to prevent losing any data in the event things go wrong.
- Ensure you have enabled virtualization in your BIOS.
Note: the setting may be named
Virtualization,VT-x,AMD-V, etc
In this guide, I will also be assuming that:
- You are using an
amd64(64-bit) architecture - You are using UEFI
- Your Windows installation is on the same hard drive as your Linux (and EFI) installation.
- Ensure neither operating system has 'Fast Boot' enabled or is hibernated.
Preparing for Raw Disk Access on a Linux host
Install VirtualBox
First, we need to install the VirtualBox application on our Linux host system.
Arch (running the stock linux kernel):
sudo pacman -S virtualbox virtualbox-host-modules-arch
Ubuntu:
sudo apt update
sudo apt install virtualbox
Setting up permissions
For some functionality to work correctly (such as the USB subsystem) your user must be in the group vboxusers. Additionally, your user must be in the disk group for raw-disk access.
sudo usermod -a -G vboxusers $USER
sudo usermod -a -G disk $USER
Where $USER is the current user (you will be running VirtualBox as).
Understanding your partition layout
Using lsblk -l, let's understand our partitions.
Running the following command:
lsblk -no PATH,FSTYPE,SIZE
Generates the following output:
...
/dev/sde              931.5G
/dev/sde1      ext4   931.5G
/dev/nvme0n1            1.8T
/dev/nvme0n1p1 vfat     500M
/dev/nvme0n1p2           16M
/dev/nvme0n1p3 ntfs     400G
/dev/nvme0n1p4 ntfs     674M
/dev/nvme0n1p5 ext4     400G
/dev/nvme0n1p6 ntfs       1T
- EFI partitions are typically 100MB < 1GB and are formatted in
FAT12/FAT16/FAT32/VFAT. - Your Windows partition will typically be the largest
NTFSformatted partition. This can vary depending on the dual-boot setup.
On my NVMe boot drive, by taking note of the sizes and filesystem types I can conclude that my EFI partition is /dev/nvme0n1p1 (/dev/nvme0n1 partition 1) and my Windows boot partition is /dev/nvme0n1p3 (/dev/nvme0n1 partition 3).
Creating the Virtual Disk
Using the partition numbers I have identified above, we can create the Virtual Hard Disk with the following command:
VBoxManage createmedium disk --filename ~/windows_raw.vmdk --format=VMDK --variant RawDisk --property RawDrive=/dev/nvme0n1 --property Partitions=1,3
Preparing for Raw Disk Access on a Windows host
Hyper-V comes with Windows 10 and 11 (Pro, Education, and Enterprise editions). Hyper-V is a Type 1 hypervisor, which does have some benefits over VirtualBox. Unfortunately, Hyper-V cannot be used if the Windows and Linux dual-boot installation are on the same physical hard drive.
This guide will use VirtualBox on the Windows host.
Understanding your partition layout
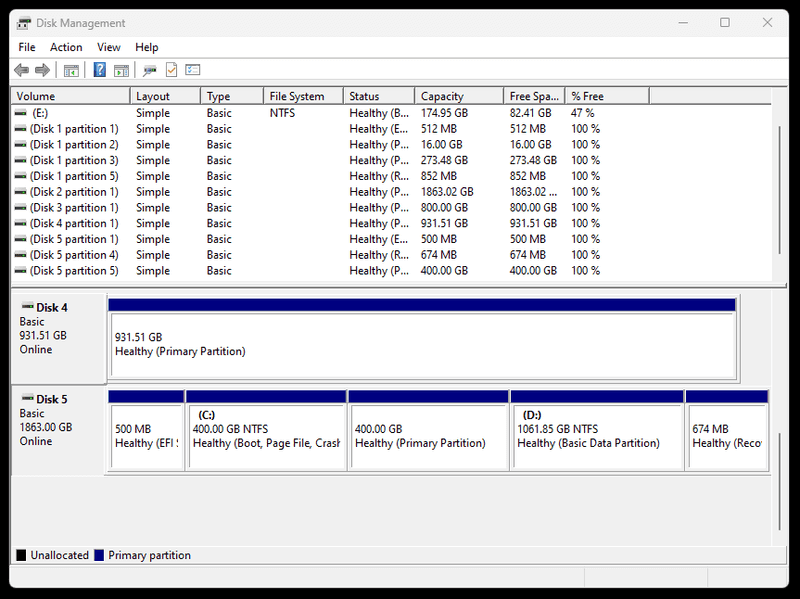
Right-click on the Start Menu icon, and open Disk Management.
On my NVMe boot drive my EFI partition is Disk 5 partition 1 and my Linux boot partition is Disk 5 partition 5.
Creating the Virtual Disk
Right-click on the Start Menu icon, and open 'Terminal (Admin)` (a PowerShell window opens).
Using the partition numbers I have identified above, we can create the Virtual Hard Disk with the following command:
& "C:\Program Files\Oracle\VirtualBox\VBoxManage.exe" createmedium disk --filename linux_raw.vmdk --format=VMDK --variant RawDisk --property RawDrive=\\.\PHYSICALDRIVE5 --property Partitions=1,5
Starting VirtualBox
Make sure to run Oracle VM VirtualBox as an Administrator (right-click and Run as administrator in the Start Menu).
Otherwise, you may encounter some issues with your .vmdk file appearing in VirtualBox as 'Normal, Inaccessibile'..
Setting up VirtualBox
Now that we have done the preparation on our host OS (either Windows or Linux) and created a VMDK file, we are ready to create the virtual machine in VirtualBox. These instructions are the same no matter the host OS.
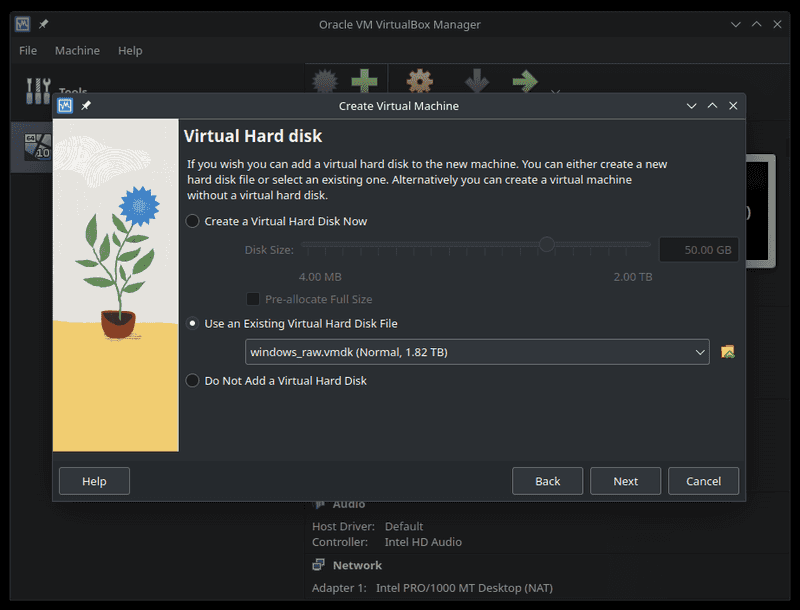
- From
VirtualBox Manager, pressNew. - Give the virtual machine a name (i.e.
Windows 10 (Raw)). - Set
Base MemoryandProcessors. TickEnable EFI (special OSes only). - Select
Use an Existing Virtual Hard Disk File, and select the.vmdkfile you created earlier before pressingFinish.
We are now ready to Start our new virtual machine. Let's reorder our boot menu so that our virtual machine always boots into the correct OS.
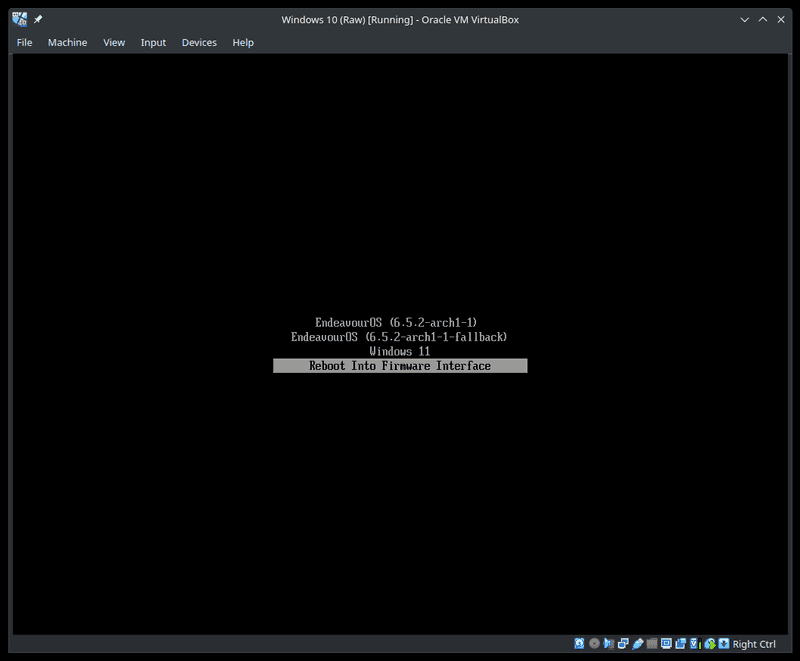
Once at the boot menu (assuming your system uses systemd-boot) press Reboot Into Firmware Interface.
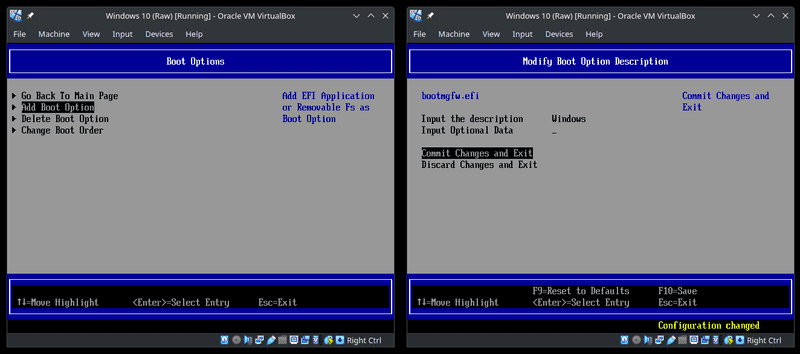
- Navigate to
Boot Maintenance Manager>Boot Options>Add Boot Option - Select your hard disk and then select
EFI/Microsoft/Boot/bootmgfw.efi - Give the boot option a description (i.e.
Windows), before selectingCommit Changes and Exit.
Then:
- Navigate to
Boot Maintenance Manager>Boot Options>Change Boot Order - Press
Enter, and then use the+key to reorder the boot options and putWindowsat the top. - Select
Commit Changes and Exit, and then save the changes and exit.
Optionally you can install Guest Additions for some further functionality (related to display-resizing, etc.).
You now have a working virtual machine.
Troubleshooting
Windows host errors
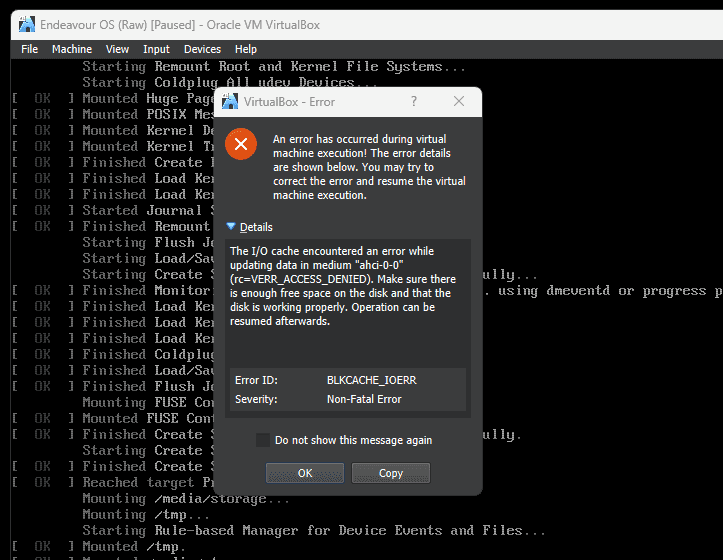
On startup after completing these instructions, you may encounter the following error.
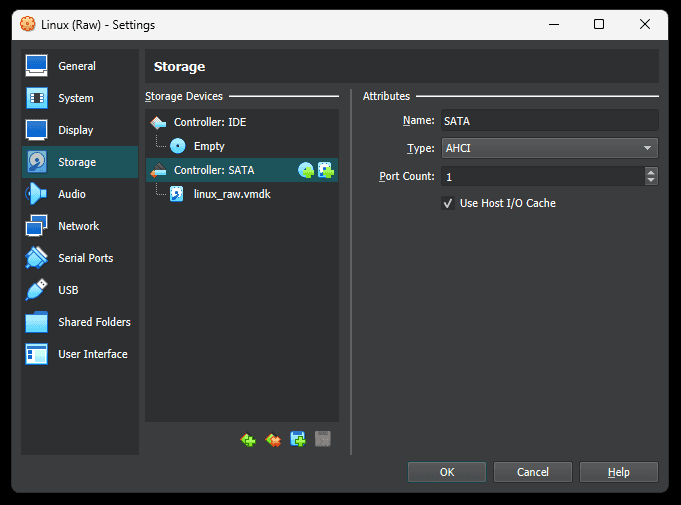
The I/O cache encountered an error while updating data in medium "ahci-0-0" (rc=VERR_ACCESS_DENIED). Make sure there is enough free space on the disk and that the disk is working properly. Operation can be resumed afterwards. Error ID: BLKCACHE_IOERR Severity: Non-Fatal Error
To fix this, make sure to "Settings > Storage > SATA > tick Use Host I/O Cache".
Additional tips
How do I access a service running on the guest?
Let's say you have a simple server running on the guest. Keep the network adapter for the virtual machine as NAT, and use port-forwarding to expose the service to the host.
You might consider using a Bridged Adapter, but this will give the guest a separate IP + MAC address on your network - which may be undesirable depending on the application.
Tags
If you found this post helpful, please share it around:

