Self-hosting SSO (Part 3): LDAP
How to use Docker to provide LDAP as centralized user management for Keycloak and services that don't natively support SSO.
Joey Miller • Last updated July 06, 2023
This guide is the third part in a multi-part series of guides:
- Self-hosting SSO (Part 1): Keycloak [with Nginx | with Traefik]
- Self-hosting SSO (Part 2): Reverse Proxy Auth with OAuth2 Proxy [with Nginx | with Traefik]
- Self-hosting SSO (Part 3): Keycloak + LDAP *here*
What is LDAP?
LDAP is an acronym for "Lightweight Directory Access Protocol". LDAP is a software protocol that is used to enable applications to query user information.
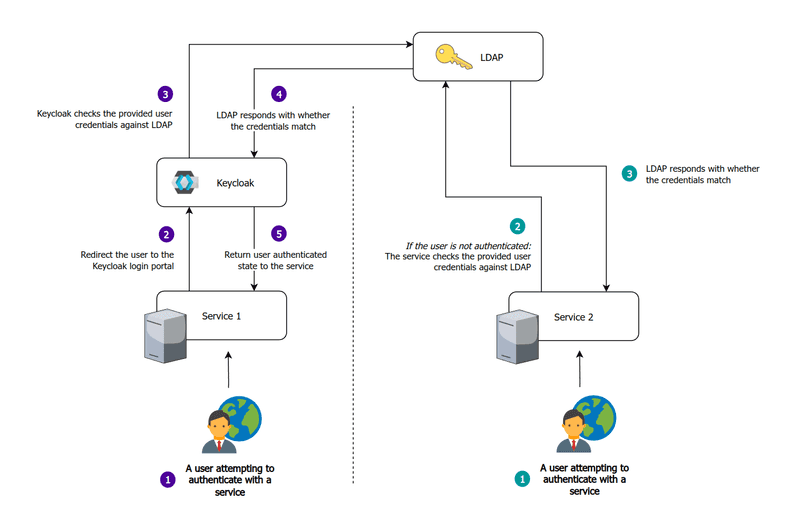
When self-hosting, we may be hosting services that do not support any form of single sign-on (such as OAuth2, OIDC, or SAML). In situations like this, LDAP can be useful to allow users to use the same set of credentials on such a service. Instead of being redirected to the Keycloak/OAuth2 Proxy login portal, the service will manage authentication itself while using LDAP as the source of truth for the credentials.
When implementing LDAP into our infrastructure, we will be making it the source of truth for user credentials. We will then connect LDAP to Keycloak. This will make LDAP users available in Keycloak and can allow for their management via the Keycloak Administration UI.

Choosing a directory server
There are many different LDAP directory server software solutions, such as FreeIPA, OpenLDAP, 389ds, lldap, etc.
- FreeIPA: built on 389ds with additional features such as an included management interface, Kerberos, etc.
- OpenLDAP: an LDAP directory server developed by the OpenLDAP Project.
- 389ds: a performant LDAP directory server developed by Red Hat.
- lldap: lightweight read-only LDAP directory server.
We want a directory server that is:
- Simple - we do not need the additional bells and whistles (such as Kerberos, etc)
- Read-write - we want changes to users in Keycloak to be reflected in LDAP
For this reason, 389ds is a good choice. Although it does not come bundled with any web interface, this is not important because after some configuration users can be managed via the Keycloak Administration UI.
Running LDAP
Add the following to your docker-compose.yml.
    ldap:
        image: quay.io/389ds/dirsrv:latest
        ## Optionally uncomment one or both ports to expose to the host
        #ports:
        #    - '389:3389/tcp'    # Unencrypted port
        #    - '636:3636/tcp'    # SSL/TLS port
        environment:
            DS_DM_PASSWORD: "password"
        volumes:
            - ./data/ldap:/data
        restart: unless-stopped
Configuring LDAP
389ds provides several commands that help configure the LDAP server.
From the official "Quick Start":
389 Directory Server is controlled by 3 primary commands.
- dsctl: This manages a local instance, requiring root permissions. This starts, stops, backs-up and more.
- dsconf: Manage a remote or local instance configuration. This requires cn=Directory Manager. It changes settings of the server and is the primary tool you will use for administration of config.
- dsidm: Manage content inside of a backend, with an identity management focus. The permissions of this tool are granted by access controls, and can even be used for some limited self service actions.
There is also ldapadd/ldapmodify/ldapdelete, etc to add/manage/delete LDAP entries.
Basic structure
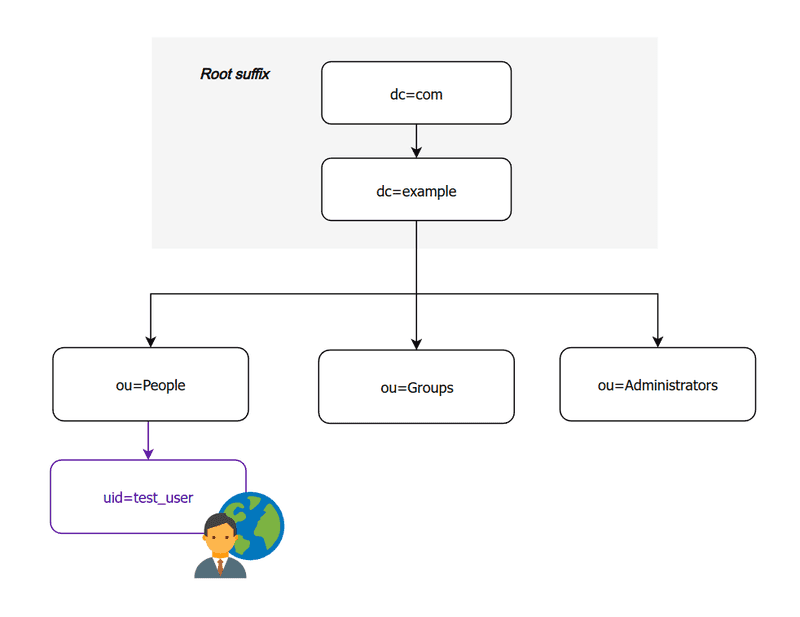
In this guide we will be implementing a very simple directory structure that consists of `People`, `Groups`, and `Administrators` (optional).

Initial setup
Out-of-the-box, no LDAP parent entry (suffix) is created. We should create one with our domain name.
First, let's enter the console for the LDAP docker container:
docker exec -it {ldap_container} bash
And create our LDAP suffix. The suffix is ["the root of the directory [...]. It could be set to whatever you like. Setting it to the domain name is simply a useful convention that ensures your directory name space is unique."](https://serverfault.com/a/11441)
bash# dsconf -v localhost backend create --suffix dc=example,dc=com --be-name example --create-suffix
Then (still inside the container), let's add the organizational units for "People" and "Groups". It isn't strictly necessary to have users and groups separated, but it will allow us to better differentiate between them going forward.
bash# ldapadd -v -H ldap://localhost:3389/ -x -W -D "cn=Directory Manager" << EOF
dn: ou=People,dc=example,dc=com
objectClass: top
objectClass: organizationalUnit
ou: People
EOF
bash# ldapadd -v -H ldap://localhost:3389/ -x -W -D "cn=Directory Manager" << EOF
dn: ou=Groups,dc=example,dc=com
objectClass: top
objectClass: organizationalUnit
ou: Groups
EOF
Note:
- Make sure to replace
dc=example,dc=comwith your domain name (example.com) - When asked to
Enter LDAP Password, use the password you set forDS_DM_PASSWORDin your Docker compose file.
Enable the MemberOf plug-in (optional)
We need to enable the MemberOf plug-in to filter users by the groups they are in when using services such as Jellyfin.
In more technical terms, this makes our schema use RFC2307bis attributes (instead of the RFC2307 attributes used by default).
From inside the LDAP docker container (as in "Initial setup"), run the following command:
dsconf -v localhost -D "cn=Directory Manager" plugin memberof enable
It is worth noting: enabling the plug-in does not retroactively create this 'memberOf' attribute on existing users. If you run into trouble, consider leaving and re-joining all groups for each user.
Configuring Keycloak to work with LDAP
Once Keycloak and LDAP are running, go to User federation from the sidebar, and click Add Ldap providers. For a full guide on configuring Keycloak see part one of this guide.
Create an LDAP provider with (leaving other fields as default):
Vendor:OtherConnection URL:ldap://ldap:3389Bind DN:cn=Directory ManagerBind credentials: (DS_DM_PASSWORDvalue)Edit mode:WRITABLEUsers DN:ou=People,dc=example,dc=comUsername LDAP attribute:uidRDN LDAP attrbute:uid-UUID LDAP attribute:nsUniqueIdUser object classes:inetOrgPerson, organizationalPerson
The default Keycloak admin user will not be synced to LDAP.
Syncing groups to Keycloak
Go to User federation > Settings > Mappers > Add mapper
Set the following fields (leaving other fields as default):
Name:groupsMapper type:group-ldap-mapperLDAP Groups DN:ou=Groups,dc=example,dc=comGroup Name LDAP Attribute:cnMembership LDAP Attribute:memberMembership Attribute Type:DNMembership User LDAP Attribute:uidUser Groups Retrieve Strategy:LOAD_GROUPS_BY_MEMBER_ATTRIBUTE

Unfortunately groups appear to be a (mostly) one-way connection. Creating a group in Keycloak will create one in LDAP, but all other changes (deleting a group, adding an attribute, etc) will not be synced back to LDAP.
Securing the LDAP installation
Disabling anonymous bind
From inside the LDAP docker container (as in "Initial setup"), run the following command:
dsconf -v localhost -D "cn=Directory Manager" config replace nsslapd-allow-anonymous-access=off
Creating additional bind users
We may not want to use the default administrative "Directory Manager" bind user on all services - especially for services that don't require write access.
From inside the LDAP docker container (as in "Initial setup"), run the following commands:
bash# ldapadd -v -H ldap://localhost:3389/ -x -W -D "cn=Directory Manager" << EOF
dn: ou=Administrators,dc=example,dc=com
objectClass: top
objectClass: organizationalUnit
ou: Administrators
EOF

bash# ldapadd -v -H ldap://localhost:3389/ -x -W -D "cn=Directory Manager" << EOF
dn: uid=admin,ou=Administrators,dc=example,dc=com
cn: admin
sn: admin
objectClass: top
objectClass: person
objectClass: organizationalPerson
objectClass: inetOrgPerson
userPassword: test
EOF
Now that we have created the additional user, we can give it some permissions. This is done by setting ACI policies. The following links here and here are good references when writing complex ACIs.
The following command will give our new LDAP admin user read-only (search,read,compare) access to any field inside our dc=example,dc=com suffix.
bash# ldapmodify -v -H ldap://localhost:3389/ -x -W -D "cn=Directory Manager" << EOF
dn: dc=example,dc=com
changetype: modify
add: aci
aci: (target="ldap:///dc=example,dc=com")(targetattr="*") (version 3.0; acl "example"; allow (search,read,compare) userdn="ldap:///uid=admin,ou=Administrators,dc=example,dc=com";)
EOF
You can view the new ACI permissions with the following command:
ldapsearch -v -H ldap://localhost:3389/ -x -W -D "cn=Directory Manager" -s sub '(aci=*)' aci
Configuring LDAP with other services
As mentioned in the earlier guides, Jellyfin is one such service that works best with LDAP when trying to set up single sign-on (SSO) for your self-hosted services. This is valuable for services with apps that have yet to implement proper SSO/Header auth support.
Jellyfin
Connecting LDAP to Jellyfin
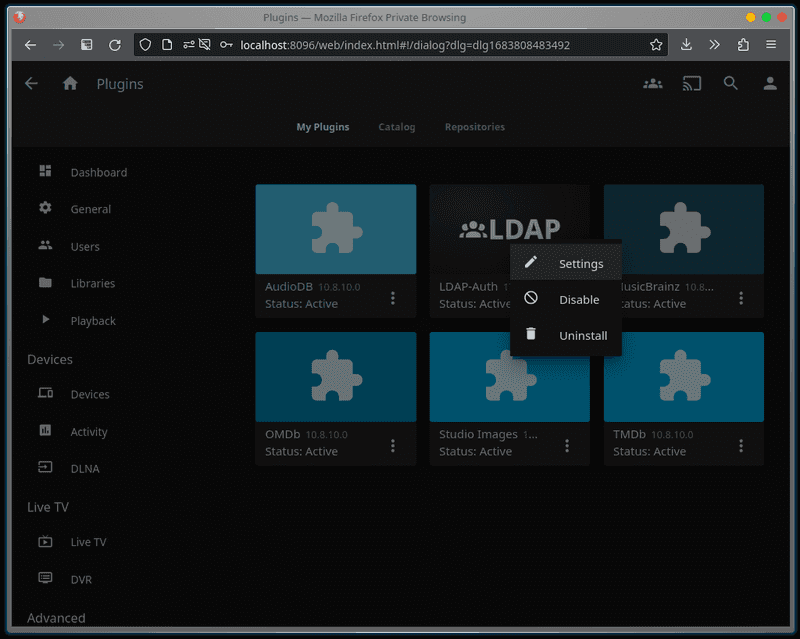
From the Administration Dashboard, go to Advanced > Plugins> Catalog and install the LDAP Authentication plugin. You may need to restart your server.
Then from My Plugins click on the three dots for the LDAP-Auth plugin and click Settings.

Assuming your LDAP installation is in the same Docker installation as your Jellfin installation, the following settings are necessary:
LDAP Server:ldapLDAP Port:3389LDAP Bind User: < bind user >LDAP Bind User Password: < bind password >LDAP Base DN for searches:ou=People,dc=example,dc=comLDAP Search Filter:(objectclass=inetOrgPerson)LDAP Admin Base DN: < blank >LDAP Admin Filter:(memberOf=cn=test_group,ou=Groups,dc=example,dc=com)Enable User Creation:true
Note:
-
Replace
< bind user >and< bind password >with either:- your default
cn=Directory ManagerLDAP admin user - the additional LDAP admin user we set up earlier in this guide (e.g.
uid=admin,ou=Administrators,dc=example,dc=com)
- your default
-
The
LDAP Admin Filterused above requires theMemberOfplugin to be enabled. As mentioned in the linked section, please be aware that this will not take effect retroactively.
Tags
If you found this post helpful, please share it around:
