Self-hosting SSO with Nginx (Part 2): OAuth2 Proxy
How to use Docker and Nginx to get started with reverse proxy authentication for services that don't natively support OAuth.
Joey Miller • Last updated July 06, 2023
This guide is the second part in a multi-part series of guides:
- Self-hosting SSO (Part 1): Keycloak [with Nginx | with Traefik]
- Self-hosting SSO (Part 2): Reverse Proxy Auth with OAuth2 Proxy [with Nginx | with Traefik] *here*
- Self-hosting SSO (Part 3): Keycloak + LDAP
Why do we need Reverse Proxy Auth?
In the first part of this guide, we covered setting up Keycloak. This gives us single sign-on (SSO) for services that can be configured to authenticate with Keycloak/OAuth2/SAML, etc. For services that don't support this, we need to additionally set up reverse proxy authentication.
An example of a service that may require this is a single-user service such as Pihole. In this case, we would disable the Pihole login page and rely on having the reverse proxy (Nginx) prevent unauthenticated users from accessing the service.
We will be configuring OAuth2 Proxy with Keycloak to accomplish this.
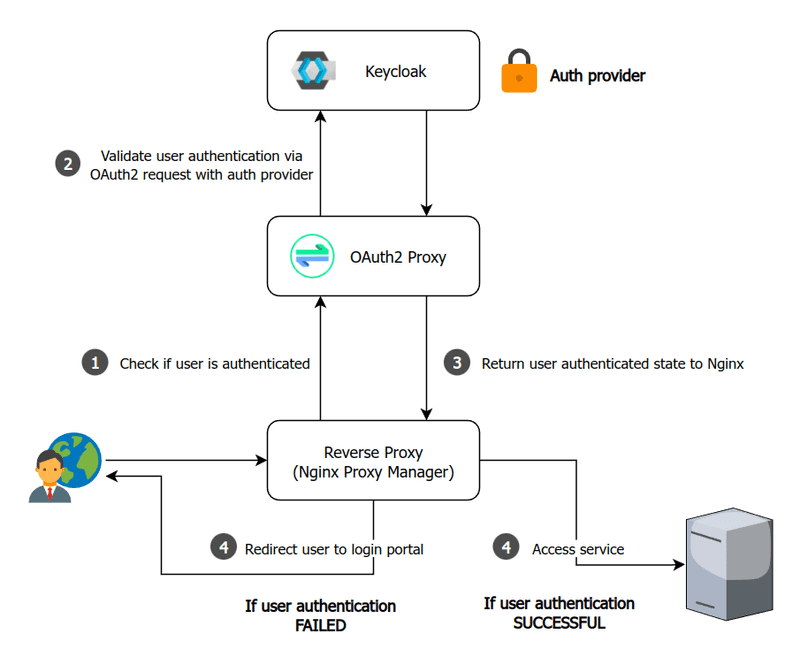
How OAuth2-proxy works
When a user attempts to access a service, Nginx can be configured to call an endpoint to check if the user is authenticated. In this scenario that endpoint is provided by OAuth2 Proxy.

Assumptions
This guide assumes you are using Docker + Nginx Proxy Manager (NPM) as the reverse proxy. This guide will be easy to adapt to bare Nginx.
Within Nginx Proxy Manager, I will be assuming you have set up SSL and are enforcing HTTPS for each proxy host. Otherwise, additional setup may be required - such as setting the environment variable OAUTH2_PROXY_COOKIE_SECURE=false for OAuth2 Proxy.
Setting up OAuth2-proxy
First, we need to create a client in Keycloak. This will be used to allow OAuth2 Proxy to validate user authentication with Keycloak.
-
Go to the
Keycloak Administration Console -
Create a new client by going to
Clients > Create client.- Leave
Client typeasOpenID Connect - Set
Client IDtooauth2-proxy - Set
Client authenticationtoOn - Set
Authentication flowto onlyStandard flow - Click
Save
- Leave
-
From the
Clients > oauth2-proxy > Credentialspage, copy theClient secret(we will be using this below) -
From the
Clients > oauth2-proxy > Settingspage:-
Set
Valid redirect URIstohttps://auth.example.com/oauth2/callback -
Set
Front-channel logout URLtohttps://auth.example.com/oauth2/sign_out- This makes sure that
OAuth2-proxysingle sign-out works.OAuth2-proxywill log itself out when a logout request is sent to our realm.
- This makes sure that
-
Add the following to your docker-compose.yml (in addition to the keycloak and npm services we already added earlier on):
    oauth2proxy:
        # internal: oauth2proxy on port 4180
        image: quay.io/oauth2-proxy/oauth2-proxy:latest
        environment:
            OAUTH2_PROXY_HTTP_ADDRESS: '0.0.0.0:4180'
            OAUTH2_PROXY_COOKIE_SECRET: '< COOKIE SECRET >'
            OAUTH2_PROXY_COOKIE_DOMAINS: '.example.com' # Required so cookie can be read on all subdomains.
            OAUTH2_PROXY_WHITELIST_DOMAINS: '.example.com' # Required to allow redirection back to original requested target.
            # Configure to use Keycloak
            OAUTH2_PROXY_PROVIDER: 'oidc'
            OAUTH2_PROXY_CLIENT_ID: 'oauth2-proxy'
            OAUTH2_PROXY_CLIENT_SECRET: '< CLIENT SECRET >'
            OAUTH2_PROXY_EMAIL_DOMAINS: '*'
            OAUTH2_PROXY_OIDC_ISSUER_URL: 'https://auth.example.com/realms/master'
            OAUTH2_PROXY_REDIRECT_URL: 'https://auth.example.com/oauth2/callback'
        depends_on:
            - keycloak
        restart: unless-stopped
Make sure to:
- Set
OAUTH2_PROXY_CLIENT_SECRETto theClient secretvalue you copied from theKeycloak Administration Console - Set
OAUTH2_PROXY_COOKIE_SECRETto a strong cookie secret you generated. See the OAuth2 Proxy docs for further instructions to help accomplish this.
Note: By default,
OAuth2 Proxyrequires that all users have theirUserspage for the realm. If you would like to remove this requirement fromOAuth2 Proxy, make sure you set the environment variablesOAUTH2_PROXY_INSECURE_OIDC_ALLOW_UNVERIFIED_EMAIL=trueandOAUTH2_PROXY_OIDC_EMAIL_CLAIM=sub.
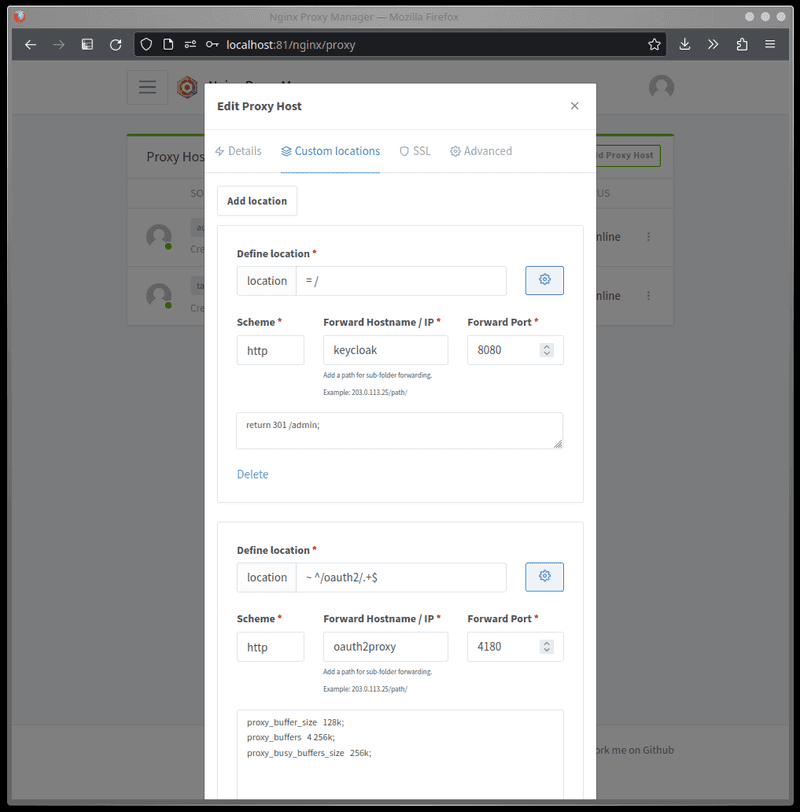
Then, let's configure OAuth2 Proxy in the NPM web interface. As mentioned earlier in this guide, we will be hosting it at auth.example.com/oauth2. Replace example.com with your domain name.
-
From the NPM dashboard, click
Editfor ourauth.example.comProxy Host. -
In the
Custom Locationstab for theauth.example.comentry, add a location:- Set
Define locationto~ ^/oauth2/.+$ - Set
Scheme,Forward Hostname / IP, andForward Porttohttp,oauth2proxy,4180(respectively)
- Set

Configuring a service for reverse proxy auth
Now that we have configured OAuth2 Proxy we are ready to use it to provide authentication to our services. I will assume such services are already being reverse proxied by NPM.
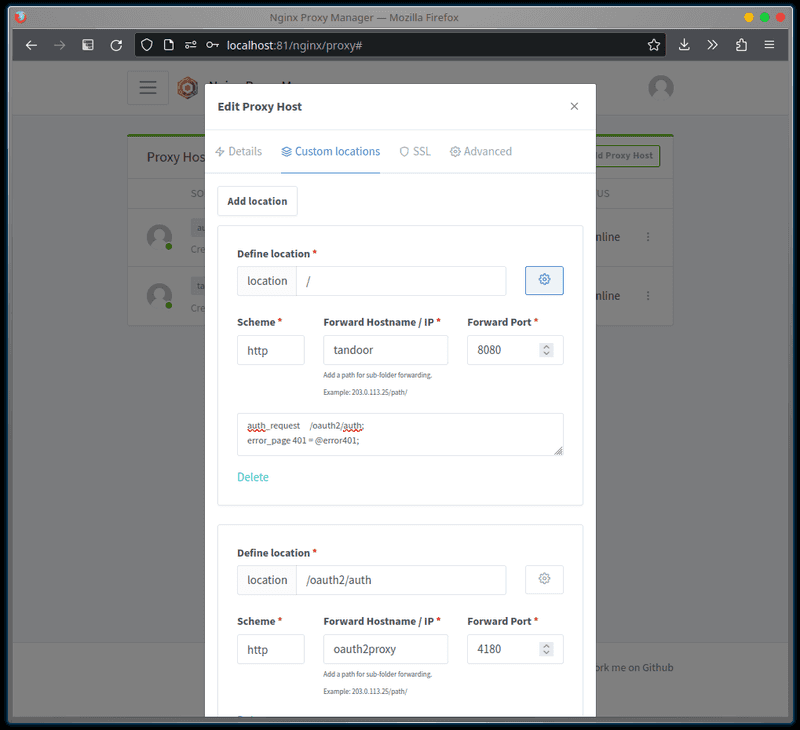
To configure a service to use reverse proxy authentication, we need need to make some changes to the service in the NPM dashboard.
-
Add location, setDefine locationto/.- Set
Scheme,Forward Hostname / IP, andForward Portfor your service - For the custom location, click the gears icon and set:
- Set
auth_request     /oauth2/auth;
error_page 401 = @error401;
-
Add location- Set
Define locationto/oauth/auth - Set
Scheme,Forward Hostname / IP, andForward Porttohttp,oauth2proxy,4180(respectively)
- Set

Under the Advanced tab, set:
location @error401 {
        return 302 https://auth.example.com/oauth2/start?rd=https://$host$uri;
}
This tells Nginx to use OAuth2 Proxy to check if we are authenticated. If we are not, we should be redirected to the login page.
Configuring HTTP Header auth (optional)
Some multi-user services support expect the reverse proxy to pass the authenticated username/email in an HTTP header.
In addition to completing the above steps, add the following to the environment: section of oauth2proxy in your docker-compose.yml:
OAUTH2_PROXY_SET_XAUTHREQUEST: true
Then, let's configure Nginx to pass the service a header to inform it of the logged-in user.
-
From the NPM dashboard, click
Editfor the service. -
In the
Custom Locationstab, find the location/endpoint that corresponds to our service (such as/):- For the custom location, click the gears icon and add the following to the field (in addition to the
auth_requestlines we added earlier) :
- For the custom location, click the gears icon and add the following to the field (in addition to the
auth_request_set $user $upstream_http_x_auth_request_preferred_username;
proxy_set_header REMOTE-USER $user;
(where REMOTE-USER is the HTTP header that the service will look for to determine the logged-in user)
Restricting users from services
In the first part of this series, we covered some approaches to prevent user(s) from accessing an entire client. Since a single OAuth2 Proxy instance/client can provide authentication for many services - we need a different approach to restrict users on a per-service basis.
OAuth2 Proxy can support restricting members by role or group.
Keycloak already provides the necessary information (client scope) to OAuth2 Proxy for restricting users by role, but some additional configuration is needed for groups:
- Go to
Client scopes>Create client scopeand create a new Client Scope with the namegroups. - In the created Client Scope, go to the
Mapperstab and clickConfigure a new mapper. ClickGroup Membershipgive it a name and setToken Claim Nametogroupsand add it. TickAdd to access tokenandAdd to userinfo. - Go to
Clients > oauth2-proxyand in theClient scopestab clickAdd client scopeand addgroupsasDefault.
Globally enforcing roles or groups
Globally enforcing a Realm role required by all users that attempt to authenticate through OAuth2 Proxy can be done by setting the environment variable OAUTH2_PROXY_ALLOWED_ROLES or OAUTH2_PROXY_ALLOWED GROUPS respectively.
For example. To require all users to be part of the oauth2proxy realm role, add the following to the environment section of the oauth2proxy service in your Docker compose file:
OAUTH2_PROXY_ALLOWED_ROLES: 'oauth2proxy'
Enforcing groups for specific service(s)
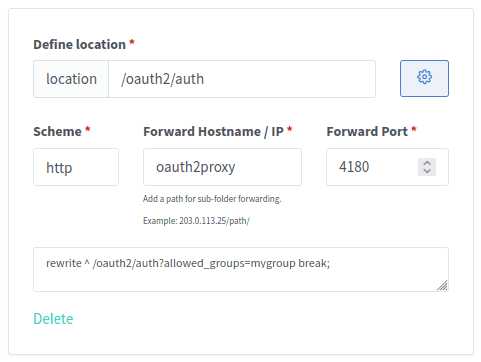
OAuth2 Proxy supports enforcing groups on a per-service basis by adding a query parameter to the /oauth2/auth location we set up earlier when "Configuring a service for reverse proxy auth".
Because Nginx/NPM does not support query parameters in the auth_request URI, we need to use a redirect instead.
To require users accessing a service to be a part of the group mygroup: click the gears icon for the service's /oauth2/auth location and set the custom configuration to:
rewrite ^ /oauth2/auth?allowed_groups=mygroup break;

What next?
We've now successfully set up an SSO implementation that will work with the majority of our services.
Some multi-user services such as Jellyfin that don't have OAuth or Header Auth support can still cause us headaches. In this case, I recommend adding LDAP to your implementation.
Tags
If you found this post helpful, please share it around:
